
If you’ve ever wondered how to make Onigiri, Japan’s iconic rice ball, you’re in the right place. Onigiri is a simple yet flavorful snack made by shaping sticky white rice into triangles or rounds, often filled with savory ingredients like tuna mayo, salted salmon, or pickled plum. It’s a beloved part of Japanese cuisine—perfect for bento boxes, quick snacks, or even light meals.
In this guide, you’ll learn how to make Onigiri step by step, including tips, fillings, and FAQs to help you master this versatile snack at home.
🍚 What is Onigiri?
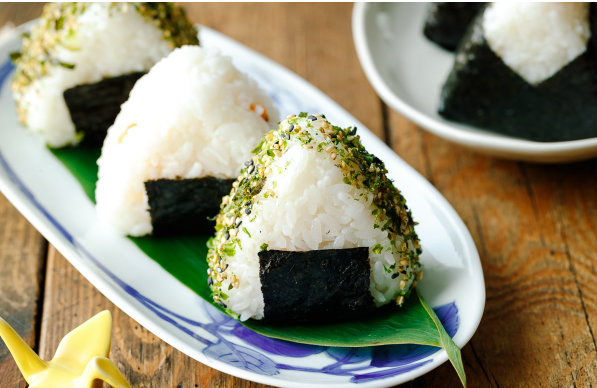
Onigiri (also called omusubi) is a Japanese rice ball traditionally made with plain or lightly salted short-grain rice and wrapped in nori (seaweed). It’s shaped by hand into a triangle or round form and can be stuffed with savory fillings or left plain. The key to a good Onigiri is the sticky rice that holds everything together without falling apart.
📝 Ingredients to Make Onigiri
🧂 Basic Ingredients:
- 2 cups Japanese short-grain rice (sushi rice)
- 2 1/4 cups water
- 1/2 teaspoon salt
- Nori seaweed sheets (cut into strips)
🧁 Optional Fillings:
- Salted salmon (grilled and flaked)
- Umeboshi (pickled plum)
- Tuna with mayo
- Kombu (seasoned kelp)
- Teriyaki chicken or spam
- Avocado with sesame
LSI keywords: Japanese rice ball recipe, onigiri fillings, how to shape rice balls, homemade onigiri guide, rice snacks from Japan, easy sushi snack, seaweed rice balls
👨🍳 How to Make Onigiri – Step-by-Step Instructions
✅ Step 1: Cook the Rice
Rinse the rice under cold water until the water runs clear. Add to a rice cooker or pot with the measured water and cook until tender. Let it steam for 10 minutes after cooking.
✅ Step 2: Season Your Hands
Once rice has cooled to a warm (not hot) temperature, wet your hands with water and rub a pinch of salt on them. This prevents sticking and lightly seasons the rice.
✅ Step 3: Shape the Onigiri
Scoop about 1/3 to 1/2 cup of rice into your palm. Flatten slightly, add a small spoonful of filling, and then mold the rice around it. Gently shape into a triangle or ball using both hands.
✅ Step 4: Wrap with Nori
Place a strip of nori around or under the Onigiri. Serve immediately or wrap tightly in plastic wrap for later.
🍽️ Serving Suggestions
- Serve with miso soup and pickles for a classic Japanese meal
- Add to lunch boxes or as a portable snack
- Pair with green tea for a light afternoon treat
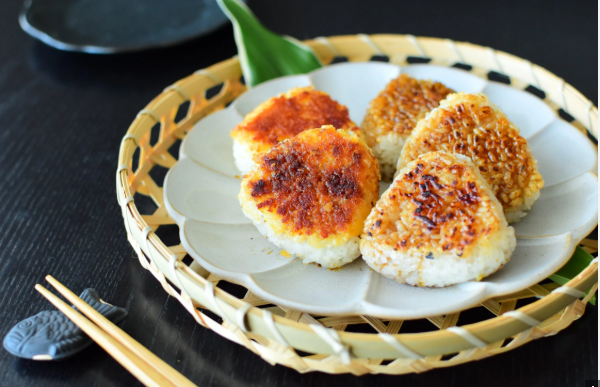
- Pan-sear leftovers with soy sauce for crispy yaki-onigiri
Read also:–Vegas Roll Sushi – The Ultimate Fusion Bite
💡 Pro Tips for Perfect Onigiri
- Use short-grain or sushi rice – long-grain rice won’t stick well
- Keep your hands wet – it makes shaping easier and mess-free
- Don’t overfill – too much filling can break the shape
- Use plastic wrap – for shaping and storage, especially with sticky rice
- Add furikake – a Japanese rice seasoning that adds flavor and color
❓ Frequently Asked Questions (FAQ)
Q1: Can I make Onigiri with regular rice?
Short-grain or sushi rice works best. Long-grain rice is too dry and won’t hold its shape well.
Q2: Can I make Onigiri ahead of time?
Yes. Store in the fridge wrapped in plastic for up to 1–2 days. Microwave lightly before eating.
Q3: Can I freeze Onigiri?
You can! Wrap each one in plastic and freeze. Thaw and microwave before serving.
Q4: Is Onigiri sushi?
Not quite. Onigiri uses plain or lightly salted rice, while sushi rice is seasoned with vinegar and sugar.
Q5: What are common Onigiri fillings?
Tuna mayo, salted salmon, pickled plum, and seasoned seaweed are traditional favorites.
🎯 Final Thoughts
Learning how to make Onigiri is like unlocking a new level of homemade comfort food. Whether you go traditional with umeboshi or modern with tuna mayo or avocado, this humble rice ball is endlessly customizable. It’s easy, affordable, and ideal for meal prep or school lunches.
Try it once, and you’ll find yourself making Onigiri again and again—it’s Japan’s most delicious grab-and-go snack for a reason.